
Mastering Buttons and Controls in Bus Simulator Ultimate
The control panel in Bus Simulator Ultimate has more buttons than most players use during their first 20 hours of play. Door controls, interior lights, hazard signals, windshield wipers, and passenger announcements all sit on the dashboard but the game never explains when each one matters or how they affect your passenger satisfaction score. Missing a door close at a terminal costs you time. Forgetting hazard lights at a roadside stop costs you rating points. This guide covers every control, what it does, and when to use it.
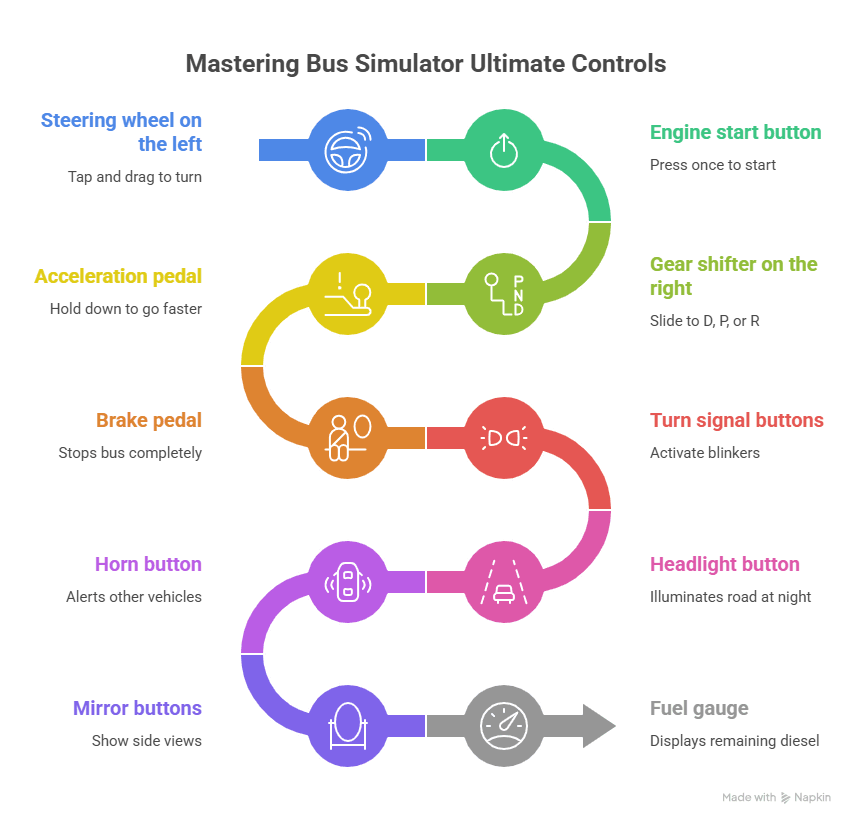
Basic Controls in Bus Simulator Ultimate Every Player Must Know
The steering wheel is on the left side of your screen. Small drags produce sharp turns, so use gentle adjustments rather than full swipes to avoid overcorrecting into traffic. Steering sensitivity increases with speed, which means highway driving requires lighter touch input than city maneuvering.
The engine start button sits at the bottom center of the dashboard. Press it once before doing anything else because the gear shifter will not respond until the engine is running. The gear shifter is on the right side: D for drive, R for reverse, and P for park. Most routes only need drive mode. Reverse is for backing into tight terminal bays. Park locks your bus in place during passenger boarding.
The accelerator and brake pedals control your speed. Hold the accelerator for highway cruising and release gradually when approaching stops. Hard braking drops your passenger satisfaction rating on every trip it happens, so ease into stops from at least 50 meters out to keep your score above 4 stars. Smooth braking also reduces fuel consumption compared to repeated hard stops.
Dashboard Controls and Indicator Lights
Turn signal buttons are on either side of the steering wheel. Tap left or right before changing lanes. The game tracks lane changes without signals as traffic violations and deducts reputation points each time it happens. Make signaling a habit on every lane change, not just when traffic is visible.
The headlight button activates during night and tunnel routes. Press it as soon as visibility drops because driving without headlights increases collision risk on dark highways and reduces your control response time at intersections. The horn button alerts vehicles blocking your path at intersections but using it excessively lowers passenger comfort ratings.
Side mirror buttons show left and right views for lane changes. Use them before every merge, especially on highway routes above 80 km/h where traffic approaches faster than your peripheral view covers. The controls setup lets you adjust mirror positioning in the settings menu for better visibility on specific bus models.
The fuel gauge shows remaining diesel as a percentage. On long intercity routes refuel at any station marked with a green icon on your map before dropping below 25 percent. Running empty mid-route costs you the trip completion bonus and forces a tow that deducts from your balance. Full fuel strategy is covered in the fuel guide.
Passenger Service Controls
The door control button opens and closes at terminals. Open doors only after the bus comes to a complete stop. Close them before pulling away — leaving doors open while moving triggers a safety violation and drops your satisfaction score for that trip. The luggage door button works separately for the cargo compartment underneath and must be opened at stops where passengers have checked baggage.
Climate control directly affects how passengers rate your trip. The AC icon activates cooling for summer and warm-weather routes. The heating icon activates for winter conditions. Leaving climate control off when the weather demands it generates complaint notifications from passengers and pulls your average star rating down across every affected trip.
The entertainment system button plays media on buses equipped with onboard screens. Not every bus has this feature — it depends on the model and upgrade level. On buses where it is available, activating it before departure adds a small but consistent satisfaction bonus on every route.
The announcement button broadcasts stop information and delay updates to passengers. The catering button serves food and drinks on long-distance runs. Both features only work on upgraded bus models and both contribute to your overall trip rating when used consistently.
Camera and View Controls
The camera button cycles between cockpit view, chase camera, and top-down perspective. Cockpit view shows your full dashboard and control panel but limits forward road visibility in dense traffic. Chase camera gives better spatial awareness on highways and makes lane changes easier. Switch between views based on the situation: cockpit for terminal arrivals where you need dashboard controls visible, chase camera for highway driving where road awareness matters more.
Pinch gestures zoom your current view in and out. Spread two fingers to zoom closer for precise parking at tight terminal bays. Pinch together to zoom out when you need a wider perspective on narrow city streets or multi-lane intersections.
Free-look mode activates by swiping on screen. Swipe left or right to check blind spots before lane changes without switching cameras. Use it alongside your side mirror buttons for full coverage before merging at highway speed.
Navigation and Map Interface
The mini-map sits in the corner of your screen showing your current position, upcoming stops, and route path. Blue markers are required stops that you must complete for trip credit. Yellow markers are optional stops that pay bonus income when visited, which adds up significantly on longer routes with multiple optional stops available.
Tap the mini-map to expand it full screen. Use the expanded view before starting any unfamiliar intercity route to locate fuel stations along your path and identify toll road sections marked in red. Planning refuel stops in advance prevents running empty mid-route, which costs you the trip completion bonus. Full fuel planning strategy is in the fuel guide.
The in-game GPS arrow guides you turn by turn through city road networks. Follow it closely in dense urban areas because missed turns add distance, burn extra fuel, and delay your arrival time, all three of which lower your passenger satisfaction rating for that trip.
Speed Control and Cruise Features
The speedometer displays your current speed in km/h. Each road type has a posted limit: highways allow 100 to 120 km/h while city streets cap at 40 to 60 km/h. Exceeding the limit triggers police fines that deduct directly from your route earnings. Staying 5 to 10 km/h below the limit is the safest approach, especially in zones where the limit drops suddenly at intersections.
Cruise control holds a constant speed without requiring you to keep the accelerator pressed. Activate it on long highway stretches to maintain steady fuel consumption and consistent arrival timing. It deactivates automatically when you brake or when road conditions change.
The speed limiter caps your maximum speed regardless of how hard you press the accelerator. Set it lower during rain or fog where wet roads reduce braking effectiveness and increase stopping distance. Matching your speed limiter to weather conditions protects your satisfaction score by preventing the hard braking events that drop your rating mid-route.
How to Adjust Control Sensitivity Settings
Open Settings then Controls to find the sensitivity slider. Start at 50 percent and adjust from there. Lower sensitivity (30 to 45 percent) makes city driving smoother because tight turns need gradual input. Higher sensitivity (55 to 70 percent) works better on highways where quick lane corrections matter at speed. You can change this mid-route without pausing.
The steering dead zone setting controls how much you need to move before the game registers input. Increase it if your bus drifts when you are not touching the screen. Decrease it if steering feels delayed or unresponsive. Test adjustments on a short city route before committing to a long intercity run where wrong settings cost you time and satisfaction points
Setting Up External Controllers and Gamepads
Xbox and PlayStation controllers connect via USB or Bluetooth when running Bus Simulator Ultimate on PC through BlueStacks, LDPlayer, or NoxPlayer. Connect the controller before launching the game so the emulator detects it during startup.
Default mapping uses the left analog stick for steering, right trigger for acceleration, and left trigger for braking. Face buttons handle doors, lights, and horn. D-pad cycles between camera views. Analog stick steering gives you finer control on highway curves above 80 km/h compared to keyboard or touchscreen input.
Custom button mapping is done through the emulator’s keymapping settings, not the in-game controls menu. Assign frequently used controls like climate, hazard lights, and door open/close to shoulder buttons so you can activate them without releasing the steering stick mid-route.
Complete Keyboard Shortcuts Reference
🎮 Essential Keyboard Controls for PC Play
| Action | Keyboard Key |
|---|---|
| Start Engine | E |
| Accelerate | W / ↑ |
| Brake | S / ↓ |
| Steer Left | A / ← |
| Steer Right | D / → |
| Open/Close Doors | Space |
| Horn | H |
| Headlights | L |
| Left Indicator | Q |
| Right Indicator | R |
| Change Camera | C |
| Open Map | M |
⚠️ Default emulator keymapping shown. Customize keys through your emulator settings. Mobile players use on-screen touch controls. Full setup in the PC guide.
Advanced Control Tips for Better Performance
Start braking at least 100 meters before every stop marker. Gradual deceleration keeps your passenger satisfaction above 4 stars consistently. Hard stops trigger standing passenger complaints that stack across the trip and pull your average rating down even if the rest of the drive was clean.
Activate turn signals 3 seconds before every lane change or turn. Late signaling or no signaling counts as a traffic violation each time. These violations deduct from your route earnings and compound into a visible reputation drop after 10 to 15 trips of repeated offenses.
Control your throttle on inclines. Ease off the accelerator on uphill stretches and apply light braking on descents instead of coasting at increasing speed. Poor hill control burns 15 to 20 percent more fuel per route compared to steady throttle management on the same road.
Common Control Mistakes to Avoid
Never pull away with doors open. The game treats open-door driving as a critical safety failure and forces a route restart from the last checkpoint. Close both passenger doors and the luggage compartment before releasing the brake at every stop.
Avoid sharp steering input above 80 km/h. Aggressive turns at highway speed cause the bus to tip and crash, ending your route immediately. Use gentle corrections at speed and save sharp turns for low-speed city maneuvering and terminal approaches.
Watch the fuel gauge on every intercity route. Refuel at 30 percent remaining, not when the warning appears. Towing costs deduct directly from your route earnings and you lose the trip completion bonus entirely. Plan refuel stops using the map before departure. Full strategy in the fuel guide.
Do not ignore passenger service controls on long routes. Leaving AC off in summer or skipping entertainment on equipped buses generates complaint notifications that drag your satisfaction rating below 4 stars across the entire trip, even if your driving was flawless.
Troubleshooting Control Issues
Controls Not Responding: Force close the app completely and relaunch. If the issue persists, clear cache in Settings → Apps → Bus Simulator Ultimate → Clear Cache. On older versions this is a known bug — updating to v2.3.0 or the latest old version build for your device usually resolves it permanently.
Steering Too Sensitive: Lower the sensitivity slider to 30 percent in control settings and increase gradually until turns feel controlled. Default sensitivity is set too high for most bus models. Heavier buses like the Setra S 531 DT need lower sensitivity than lighter city models.
Controller Not Detected: Enable gamepad support in your emulator settings before launching the game. BlueStacks requires manual button mapping for non-Xbox controllers. LDPlayer detects most USB and Bluetooth gamepads automatically. Full PC emulator setup covers controller configuration for all three emulators.
Camera Snapping to Wrong Angles: Disable auto-camera correction in visual settings. This forces the camera to stay where you position it instead of resetting after every turn. iOS players experience this more frequently due to gyroscope interference — disabling tilt controls in settings fixes it.
Frequently Asked Questions About Bus Simulator Controls
Yes, steering wheel controllers work when playing through PC emulators like BlueStacks. Wheels such as Logitech G29 and Thrustmaster T150 connect via USB and can be mapped inside the emulator’s control settings. Mobile devices do not support steering wheels directly.
Control lag is usually caused by low device performance or multiplayer network latency. Lower graphics settings, close background apps to free RAM, and ensure a stable internet connection when playing online.
Go to Settings → Controls, scroll to the bottom, and tap Reset to Default. This restores original button layout and sensitivity. Any custom layout will need to be set again.
Tilt steering works best for beginners on mobile because it feels more natural. Start with around 40% sensitivity. PC players should use keyboard controls rather than mouse steering for accuracy.
No. The steering wheel always appears on the left side in Bus Simulator Ultimate. This matches real-world bus layouts, and right-hand drive options are not currently supported.
The bus must be moving before steering works. Buses cannot turn while stationary. Also check that steering input is enabled in settings, as touch controls can be accidentally disabled.
Bus Simulator Ultimate does not have a separate handbrake button. The P (Park) gear functions as the parking brake. Shift to P when stopped to prevent rolling.
No. The MOD APK uses the exact same controls as the official version. All buttons, sensitivity options, and controller behavior remain the same. MOD features only affect money and unlocked content.
Final Thoughts on Control Mastery
Start with short city routes to build muscle memory on steering, braking, and door controls. Move to highway routes once your lane changes and speed management feel consistent. Save intercity runs for after you are comfortable with cruise control, climate settings, and passenger service buttons since those features affect your satisfaction score most on longer trips.
Test these controls across different bus models because heavier coaches handle differently from lightweight city buses at every speed range. Once your controls are dialed in, the beginner guide covers how to turn that driving consistency into a profitable fleet operation.